
PIANO Premier KAWAI Legend
MANUAL
Thank you for purchasing the PIANO Premier “KAWAI Legend”.
PIANO Premier “KAWAI Legend”をお買い上げ頂き誠にありがとうございます。
Version History
バージョン履歴(To update Press the Update button in Native Access. Native AccessのUpdateボタンで更新して下さい。)
Version 1.2.2 – 2024-06-20
- Fixed a bug where sound would remain even after release.
- Fixed the timing of mechanical noise when keying off so that it would sound regardless of pedal.
- Fixed an issue where the zone sample length setting was broken in the 96kHz version.
- Re-adjusted the velocity map and zone settings.
- Other minor bug fixed
Version 1.2.1 – 2024-06-10
Maintenance update to nki files.
Version 1.2.0 – 2024-06-10
- 48kHz/16bit sample version included.
- Revised the release parameter calculation algorithm.
- Added the release parameter calculation method that can be adjusted to the user’s preference by pressing the “Release control” button on the settings screen.
- A WN Filter button has been added to the settings screen for situations where the S/N ratio is prioritized. When turned ON, the white noise filter (low pass filter) that is linked with the Decay of the main and overtone sample groups becomes active. The default setting is OFF (= bypass).
- The noise filter is activated when the release knob and mechanical knob are 60% or higher.
- Reduced the volume variability of the weak touch keys. However, adjustments are kept to a minimum based on the concept of reproducing the realism of the actual machine. If you want to make further adjustments, open the group mapping editor and adjust the level of each zone according to the Kontakt documentation.
- Corrected – the OverTone volume is linked to the PP softer.
- Adjusted the synthesis speed of the harmonic resonance that is synthesized when the pedal is turned on after a note-on with the pedal off.
- Adjusted the damper reaction area when using half-pedals. (determined as Max when CC64 value is 81 or higher)
- Adjusted the harmonics of the limit breaking sound when the pedal is on.
- Changed the default mode of the velocity curve on page 2 to “Linear”.
- Deleted Factory Snapshots.
Fixed bug
- Resolved the issue where a note-off did not occur when the same note was played repeatedly.
- Resolved an issue where there were cases where pedal noise did not occur.
- Other minor bug fixed
Version 1.0.0 – 2023-12-22
- Released
Version 1.2.2 – 2024-06-20
- Releaseしても音が残留するケースがあった不具合を修正しました。
- キーオフ時のメカニカルノイズ発音タイミングを、ペダルに関わらず鳴るように修正しました。
- 96KHz版において、ゾーンのサンプル長設定が壊れていた症状を修正しました。
- ベロシティマップ、ゾーン設定を再調整しました。
- その他の軽微なバグを修正しました。
Version 1.2.1 – 2024-06-10
メンテナンス・nkiファイルのアップデート
Version 1.2.0 – 2024-06-10
- 48kHz/16bitサンプル版を同梱
- リリースパラメータ算出アルゴリズムを改善
- 設定画面にて「Release control」ボタンを押すことでリリースパラメータ算出方法をユーザー好みに調整できるようインターフェイス追加
- S/N比優先時のために、主要音およびOverToneサンプルグループに、Decay連動ホワイトノイズフィルターを設置。設定画面「WN Filter」ボタンOnで発効。デフォルトではOff(=ハード・バイパス)
- 弱いタッチキーの音量のばらつきを減少させました。ただし実機のリアリズムを再現するというコンセプトに基づいて、調整は最小限に抑えられています。さらに調整を行いたい場合は、グループマッピングエディタを開き、Kontaktのドキュメンテーションに従って各ゾーンのレベルを調整してください。
- リリースノブ及びメカニカルノブを60%以上に上げた際に、それぞれノイズフィルターが発動するよう変更(それ以下はハード・バイパス)
- オーバートーンの音量がPPソフターに連動するよう修正
- ペダルオフでのノートオン後にペダルオンにした際に合成される共鳴音(ハーモニックレゾナンス)の合成速度を調整
- ハーフ対応ペダル使用時のダンパー反応領域を調整 (CC64値81以上で踏切り判定)
- ペダルオン時の限界突破音のハーモニクスを調整
- Factory Snapshotsを削除
バグ・フィックス
- 同一ノート連打時にノートオフが発生しないケースがあった不具合を解消
- ペダルノイズが発生しないケースがあった不具合を解消
- その他軽微な修正
Version 1.0.0 – 2023-12-22
- リリース
Install
インストール
KAWAI Legend can be installed directly from Native Access:
See Native Instruments Instruction.
The KAWAI Legend includes only one best combination of sounds from multiple microphones. Please start a new 96kHz session in your DAW, launch Kontakt and open KAWAI Legend.
Two tabs, the Main tab and the Velocity Map tab, are provided in the lower left, each with several knobs. The default settings are the most faithful to the original sound. Normally, without adjusting anything from the initial settings, just playing and recording as it is will give you the best performance.
In order to use it with a quality close to the original 96kHz version even in sessions such as 48kHz, 44.1kHz, we have prepared a 48kHz specification from version 1.2.0.
KAWAI Legendは、Native Accessから直接インストールできます:
インストール詳細はNative Instruments社のインストラクションを参照下さい。
KAWAI Legendには、複数立てたマイクの中からベストな組み合わせのサウンドが一つだけ収録されています。お使いのDAWで96kHz新規セッションを立ち上げ、Kontaktを起動しKAWAI Legendを開いて下さい。(Kontakt スタンドアロンでもご使用頂けます。)
左下にMainタブ、Velocity Mapタブの2つのタブが用意され、それぞれいくつかのノブがありますが、初期設定値が最もオリジナルの原音に忠実なセッティングです。通常は初期設定のまま、何も調整せずにそのまま演奏、録音するだけで最高のパフォーマンスを発揮します。
48kHz, 44.1kHz等のセッションでも、オリジナルの96kHzバージョンに肉薄するクオリティでご使用いただくために、バージョン1.2.0から48kHz仕様もご用意しました。
Main Panel
メインパネル

-
OVERTONES 0-100 (%)
 Particularly when striking a key with the damper off, if there are other notes being held down (i.e., the felt is up and able to resonate), a resonant response occurs depending on the relationship with the harmonic components.
Such harmonic resonance, which is often ringing without your knowledge in the real instrument, is virtually added by sampling the resonance sound. Just like the real instrument, the change in the volume of the resonance sound due to velocity is surprisingly small, and a larger or smaller volume of resonance occurs due to the relationship between the strings.
Not only the physical theoretical value, but also based on the vast amount of resonance data between each string on the real instrument, it has been reproduced as realistically as possible. The default (Center: 50) is the recommended value, but you can enjoy a fantastic sound if you increase it, and a clear sound if you decrease it.
If you turn the knob below the median, the volume of the resonance sound decreases and resonance will not occur from the strings with weaker resonance (three stages). At 0, all the corresponding sample playback itself will be off, which will also save the number of sounds and processing ability.
When you turn the knob above the median, the volume of the resonance sound increases, and the playback of the resonance sound also starts when you strike a key with the damper on. Since the damper is originally released from the felt in the damper on, the original sound (already recorded) that comes with all the resonance rings even if it is not added, but to balance it so that it does not become unnatural even if it is played alternately with the resonance sound of the damper off, it is reinforced. In other words, please note that the default median (or somewhat lower) is the most faithful and natural.
All knobs will return to the default value by pressing Ctrl + Click on Windows, or Command + Click on Mac.
_ -
RELEASE (Noise) 0-100 (%)
 It adjusts the volume of the release sound that occurs when you release your hand from the keyboard. It directly controls the Volume of the internal release sample group. Because it is a sampling of raw sounds, it contains various sounds such as the reverberation at the time of release and the operating sound of the mechanism, so adjust carefully. When it exceeds 60, the noise cut filter will be activated. The default (Center: 50) is the recommended value.
_ -
MECHANICAL (Noise) 0-100 (%)
 There is a slight mechanical noise included in the release sound of 2, but it can be emphasized by this knob. Mechanical operating sound is added to each key at both keying and releasing. The default (Off: 0) is the recommended value, but you can adjust to your preference. If you are considering from the audience’s perspective or normal recording, 0 is the best. When it exceeds 60, the noise cut filter will be activated.
*Note: When it is 0, the corresponding sample playback itself will be turned off, which will also save the number of sounds.
_ -
HARMONIC RESONANCE (Damper) 0-100 (%)
 This is a feature related to OVERTONES. When a “certain key” is sounded with the damper pedal off, and without releasing your hand, if you then turn the damper pedal on, as mentioned in item 1, the surrounding strings will begin to resonate, gradually enriching the sound. This adjusts the level of the resonance volume at this time. It is more appropriate to adjust it in conjunction with OVERTONES 1 (Noise). The default value (Center: 50) is recommended.
_ -
PEDAL (Damper) 0-100 (%)
 The sound when you press the damper pedal and the felt is released from all keys. Also, the sound of the pedal returning with a thud when released. Adjust the volume with the knob. In the case of a half-supporting damper pedal, in addition to optimizing the timing of the sound, it is designed not to make a sound when gently released. Please cut as necessary, such as from the audience’s perspective. Default value (Center: 50).
_ -
REVERB 0-100 (%)
 Adjust the level of added reverberation. It is a reverb that sampled the Impulse Response of actual halls and studios. There are no detailed parameters other than the level.
_ -
IR SELECTOR
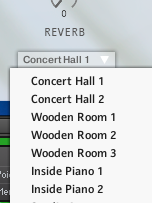 You can select from the following sampling reverb’s Impulse Response. Enjoy the real reverberation, such as the large hall (Concert Hall 1・2) suitable for the competition model Shigeru Kawai EX competing with the world, and Inside Piano where you can experience the inside of the piano body. In addition, it is equipped with the small to medium halls (Wooden Room 1~3) that were popular in previous PREMIER SOUND FACTORY products, the natural room sounds of different sizes in recording studios (Studio A・B), Roland’s tape echo (Space Echo 0~4), and the cosmic super-reverberation (Lunar Kaguya). It is a selection menu by mouse, but remote selection is also possible from Komplete Kontrol keyboards and others considering accessibility. If you make a remote selection, there may be a few seconds of lag time until the change is applied.
Concert Hall 1
Concert Hall 2
Wooden Room 1
Wooden Room 2
Wooden Room 3
Inside Piano 1
Inside Piano 2
Studio A
Studio B
Space Echo 0
Space Echo 1
Space Echo 2
Space Echo 3
Space Echo 4
Lunar Kaguya 1
Lunar Kaguya 2
-
OVERTONES 0~100(%)上段左
特にダンパーOFF時の打鍵の際、他に押鍵したまま(=フェルトが浮いて共振可能な状態)のNoteがあれば、倍音成分等との関係性に応じて共鳴反応が発生します。実機では知らないうちに多数鳴っているこうした倍音共鳴を、共鳴音のサンプリングにより仮想的に付加します。実機同様、ベロシティによる共鳴音量の変化は存外に小さく、それ以上に弦同士の関係性による共鳴音量の大小が生じます。
物理的理論値のみでなく、実機での各弦同士の膨大な共鳴実績データをもとに、極力リアルに再現しています。
デフォルト(Center : 50)が推奨値ですが、大きくすれば幻想的に、小さくすればクリアなサウンドを楽しんで頂けます。
※ツマミを中央値より下に回すと、共鳴音の音量低下と共に、より共鳴力の弱い弦からは共鳴が発生しなくなります(3段階)。0の時には全て当該サンプル再生自体がオフになりますので、発音数および処理能力の節約にもなります。
・ツマミを中央値より上に回すと、共鳴音の音量増加と共にダンパーOnでの打鍵時にも共鳴音の再生を開始します。本来ダンパーOnでは元々フェルトから解放されているため、付加しなくとも全て共鳴を伴った本来のサウンド(収録済)が鳴りますが、ダンパーOff時の共鳴音と交互に鳴らしても不自然にならないようバランスを取るために、補強します。即ち、飽くまでもデフォルト中央値(~やや下げる程度までの範囲)が最も忠実かつ自然である点にご留意ください。
※全てのノブはWindowsではCtrlキー + クリック、Macではコマンドキー + クリックで初期値(50)に戻ります。
_ -
RELEASE (Noise) 0~100(%)上段中
鍵盤から手を離した際に発生するリリース・サウンドの音量を調整します。内部のリリースサンプル・グループのVolumeを直接コントロールします。生音のサンプリングであることから、リリース時の残響や機構の動作音など様々な音が含まれているため、調節は慎重に。60を超えるとノイズカットフィルターが作動します。デフォルト(Center : 50)が推奨値です。
_ -
MECHANICAL (Noise) 0~100(%)上段右
2のリリースサウンドにもわずかに機構のノイズが含まれていますが、このノブにより強調することが可能です。打鍵時・離鍵時どちらもキー別に機構動作音が付加されます。
デフォルト(Off : 0)が推奨値ですが、お好みで。観客視点や通常レコーディング想定の場合には、0のままが最適です。60を超えるとノイズカットフィルターが作動します。
※0の時には当該サンプル再生自体がオフになりますので、発音数の節約にもなります。
_ -
HARMONIC RESONANCE (Damper) 0~100(%)下段左
1のOVERTONESと関連のある機能です。ダンパーペダルOffで「ある鍵」を鳴らし、手を離さず、そのままダンパーペダルをOnにすると、1の項の通り周囲の弦が共振し始めるため響きが徐々に豊かになります。この際の共鳴音量レベルを調整します。
1のOVERTONES (Noise)と併せて調整して頂くとより適切です。
デフォルト(Center : 50)が推奨値です。
_ -
PEDAL (Damper) 0~100(%)下段中
ダンパーペダルを踏み込みフェルトが全鍵から離れる時の音。そしてペダルを離すときのゴツンと戻る音を収録。ノブで音量を調整します。
ハーフ対応のダンパーペダルでは、発音タイミングの最適化に加え、そっと離した場合には鳴らないような工夫が盛り込まれています。
観客視点など、不要な場合は適宜カットしてご使用ください。
デフォルト値(Center : 50)
_ -
REVERB 0~100(%)下段右
付加する残響音のレベルを調整します。実際のホールやスタジオのImpulse Responseをサンプリングしたリバーブです。お手軽かつ本格的。レベル以外の細かいパラメータはありません。
_ -
IR SELECTOR
以下のサンプリング・リバーブのImpulse Responseを選択出来ます。世界と競うコンペティションモデルShigeru Kawai EXに相応しい大ホール(Concert Hall 1・2)や本体ピアノ内部を体験できるInside Pianoなど、本物の残響をお愉しみください。
また、これまでのPREMIER SOUND FACTORY製品で人気のあった小~中ホール(Wooden Room 1~3)や、レコーディングスタジオの、サイズの異なる自然な部屋鳴り(Studio A・B)、Rolandのテープエコー(Space Echo 0~4)、宇宙的スーパー残響(?)のLunar Kaguyaを搭載しています。
マウスによる選択メニューですが、アクセシビリティを考慮しKomplete Kontrolキーボードなどからリモート選択も可能です。リモート選択を行った場合には、変更の適用まで数秒程度のタイムラグが生じる場合があります。Concert Hall 1
Concert Hall 2
Wooden Room 1
Wooden Room 2
Wooden Room 3
Inside Piano 1
Inside Piano 2
Studio A
Studio B
Space Echo 0
Space Echo 1
Space Echo 2
Space Echo 3
Space Echo 4
Lunar Kaguya 1
Lunar Kaguya 2
Velocity Map Panel
ベロシティMapパネル

-
VELOCITY CURVE (Selector)
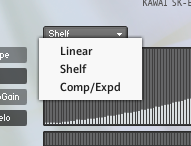 You can adjust the velocity curve according to your keyboard characteristics and preferences. You can choose from 01.Linear (linear), 02Shelf (S curve), 03Comp/Exp (compression/expansion). On initial startup, 01.Linear (linear) is set.
The roles of 9.SHAPE and 11.Maximum Velocity in the next section will change depending on the curve selection. This is based on the Kontakt KSP factory preset “Change Velocity”. Below the conversion graph table for each velocity (the horizontal direction is the input velocity. 1, 2, 3, etc. from the left, with 127 being the furthest to the right. The vertical direction is the output velocity after conversion), there is a velocity meter, and to the right, there is an output (Out: after conversion) velocity value monitor (see 13 below). Below that is an after-touch meter, and to the right is an after-touch value monitor. When 15.VELOCITY PLUS is activated as described later, the display shows the virtual velocity value that has exceeded the limit.
_ -
SHAPE (Curve, Ratio)
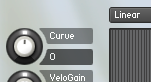 When Linear (01) is selected in the preceding item 8.VelocityCurve selection menu (or the same preset is loaded), this knob switches to the display of the curve Curve value along with the display name. (Default Curve value: 0 = straight line). Adjust the curvature with this knob that has switched to Curve (- side for convex curvature. + side for concave curvature.).
_
 When you select Shelf(02) in the previous item 8.VelocityCurve selection menu (or load the same preset), this knob will switch to the display of the S-curve Shape value along with the display name. (Default Shape value: -23). Adjust the S-curve curvature (S-curve curvature on the – side. Reverse S-curve curvature on the + side.) with this knob that has switched to Shape.
_
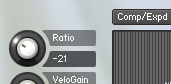 When you select Comp/Expd(03) in the previous section 8.VelocityCurve selection menu (or load the same preset), this knob switches to display the ratio value along with the display name. (Default Ratio value: -21). Adjust the compression/expansion ratio (- for compression, + for expansion) with this knob that has switched to ratio, and adjust the start point of compression/expansion with the switched threshold in section 11 (described later).
_ -
VELOCITY GAIN (+-10Velocity)
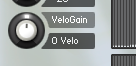
Adjusts all velocity outputs by a constant amount. Default value: 0
_ -
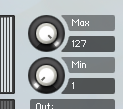
MAX VELOCITY (Threshold) 1-127
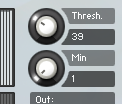
The maximum output velocity. The default is 127. When you select Comp/Expd(03) from the 8.VelocityCurve selection menu (or load the same preset), this knob switches to display the threshold value along with the display name (default Thresh. value: 39). Adjust the starting point for compression/expansion at this knob which has switched to the threshold.
_ -
MIN VELOCITY 1-127
Minimum output velocity. The default is 1. If you set it to the same value as the Max value of 11, all velocities will be output as the same velocity.
_ -
VELOCITY MONITOR AFTERTOUCH MONITOR
 The upper section is the velocity value monitor after conversion (Out), and the lower section is the aftertouch value monitor. When the later-described 15. Velocity + (Plus) is activated, the display will show the virtual velocity value that has exceeded its limit.
_Discussion and Verification on Velocity Operation:
Selecting Linear(01) in the 8.VelocityCurve selection menu, setting 9.Curve value to 0=straight line, and leaving the rest at their initial values, can be said to be the most faithful state to the accurate velocity response at the time of recording during playback. However, in MIDI performances, the velocity characteristics of the keyboard differ for each product, and especially for players with high performance skills, there is an image of “I want it to sound this much with this much strength”.
Especially for advanced performers, by adjusting the velocity changes with your keyboard and the sound changes with our product to a point “close to the image”, you can enjoy a more immersive and realistic performance. *If you have obtained the optimal adjustment value, we would be delighted if you could send us examples of setting values and combinations of devices.
_
-
PP SOFTER 0-100 (%)
 This is a knob that makes a weak touch even quieter through the volume adjustment filter processing within Kontakt. This is for volume adjustment, not for velocity control.
By turning up this knob, softer hits will become quieter. Depending on your MIDI keyboard, there may be a tendency to set a larger range in the weak hit area, and you may find it easier to add dynamics by turning up the knob.
If you eliminate the characteristics of the MIDI keyboard, using this at the default value: 0% is the most faithful to the actual recording response. Advanced players, or those who are concerned, please use it closer to your feeling, just like velocity adjustment.
_ -
VELOCITY PLUS (On/Off) PCT PAT.P
 ON
ON  OFF
OFF
This is a feature that breaks the limit of MIDI sound source when hitting hard, and realizes a velocity of 128 to 254 that exceeds the strongest pseudo. (A keyboard with an aftertouch function is required for performance.)
At the time of hitting with the normal velocity 127, the normal strongest sound sample is played, but if aftertouch is also detected within a very short time (almost unrecognizable) immediately after that, it will quickly and very naturally replace it with a sample sound stronger than the normal strongest sound. As a result, it is possible to express beyond velocity 127 at points such as the best point during the performance.A sense of dynamism is added to MIDI music. Applied for a PCT international patent in one lump sum. (PCT PAT.p) In the classic DEMO listening corner of the product site, this activation is prepared in several places. Please enjoy a powerful performance.
Click to switch the function on and off. When off, it is gray, and when on, it is a color icon. We have arranged a three-stage limit-breaking sound layer according to the peak value within the aftertouch detection time.
To activate it during performance, a keyboard that supports aftertouch is required, but even if there is no compatible keyboard, you can manually activate the playback by adding aftertouch information later in DAW etc.The aftertouch information detection for activation works only immediately after the velocity 127 NoteOn is detected. Also, it is limited to within 20ms from NoteOn of velocity 127. Aftertouch information other than that limited moment is completely ignored. Therefore, even if aftertouch information is indiscriminately mixed in MIDI data, it is hardly affected. Compatible with both channel aftertouch (Mono_AT) and polyphonic aftertouch (Poly_AT). Regardless of the activation conditions, if either is detected, the value will be displayed in real time in the aftertouch monitor 13 along with the determination of Mono or Poly.
In addition, when the limit-breaking sound is activated, the Velocity+: “virtual velocity value” is displayed on the aftertouch monitor 13, and the LED indicator under the button icon lights up for 0.3 seconds. The judgment of velocity 127, which is the activation condition, is based on the value after the velocity conversion in the previous 8 to 13.
Reference: Compatibility of “Velocity+ (Plus)” feature (excerpted and expanded from patent application documents):
The “Velocity+ (Plus)” function of the device equipped with the limit-breaking mechanism in this invention is upward compatible and can accept without any loss the general MIDI data (performance data) created and completed by the old method on existing devices up to key velocity 127. The limit-breaking function does not naturally activate because the general MIDI performance data does not include aftertouch information, and it can be played back at exactly the same strength as the existing equipment. On the contrary, if aftertouch information with a strong attack is recorded in the performance data, the limit-breaking is activated, and the “expression beyond the limit” intended by this invention is expressed, despite being old recordings and productions.
【0059】
In existing MIDI performance data, even if aftertouch data is mixed in with different intentions, in this embodiment, the possibility of malfunctioning is low because only aftertouch within 0.02 seconds from the sound is detected as the activation condition for each monophonic velocity value 127 (strongest sound). Even if it malfunctions, the strongest sound can only sound stronger, and the impact on the music is limited. After all, the limit-breaking function can be turned off, so the impact can be eliminated.
【0060】
(Lower Compatibility) (Reproducibility with existing equipment)
Contrary to the above, MIDI performance data with limit-breaking information (key velocity 127 + aftertouch) recorded and created using the limit-breaking program according to this embodiment can be almost accepted without any loss even in electronic musical instruments and electronic devices that do not have the limit-breaking program according to this embodiment.
【0061】
MIDI performance data with aftertouch information entered as limit-breaking is ignored in existing devices that do not have the limit-breaking program, and is played back as mere key velocity 127 (strongest sound). Limit-breaking (sound substitution) naturally does not activate, but can be played back without problems at the maximum dynamics (range of strength) of existing devices.
【0062】
In the rare case where aftertouch was assigned to another function in existing devices (electronic musical instruments and electronic devices that do not have the limit-breaking program according to this embodiment), the effect of it being activated may occur, but the aftertouch data for limit-breaking according to this embodiment is extremely short, within 0.02 seconds after striking, and aftertouch is universally “returns to 0 when the hand is released” data (under MIDI standards), so the impact is limited.
【0063】
That is, there is a merit of being able to obtain additional advantages only in electronic musical instruments and electronic devices equipped with the limit-breaking program according to this embodiment, while maintaining high affinity and compatibility with existing MIDI devices and MIDI performance data.
-
VELOCITY CURVE(選択メニュー)
お手持ちの鍵盤特性やお好みに合わせてベロシティカーブを調整できます。01.Linear(線形)、02Shelf(S字カーブ)、03Comp/Exp(圧縮/拡張)を選べます。初回起動時は01.Linear(線形)がセットされています。カーブの選択項目により、次項の9.SHAPE、および11.Maximum Velocityの役割が変化します。
Kontakt KSPのファクトリープリセット「Change Velocity」を参考にしています。ベロシティ毎の変換グラフテーブル(横方向が入力ベロシティ。左から1、2、3、と並び、最も右が127。縦方向が変換後の出力ベロシティ)の下には、ベロシティメーター、右には出力(Out:変換後)ベロシティ値モニターがあります。(後述13)
その下にはアフタータッチメーター、その右にはアフタータッチ値モニターがあり、後述の15.VELOCITY PLUSが発動すると、表示内容が限界突破した仮想ベロシティ値が表示されます。
_ -
SHAPE(or Curve, or Ratio)左上配置
前項8.VelocityCurve選択メニューでLinear(01)を選択(または同プリセットをロード)すると、当ノブが表示名と共に曲線Curve値の表示に切り替わります。(デフォルトCurve値:0=直線)。Curveに切り替わった当ノブで湾曲率(-側で上凸型湾曲。+側で凹型湾曲。)を調節します。
_
前項8.VelocityCurve選択メニューでShelf(02)を選択(または同プリセットをロード)すると、当ノブが表示名と共にS字曲線Shape値の表示に切り替わります。(デフォルトShape値:-23)。Shapeに切り替わった当ノブでS字湾曲率(-側でS字型湾曲。+側で反S字型湾曲。)を調節します。
_
前項8.VelocityCurve選択メニューでComp/Expd(03)を選択(または同プリセットをロード)すると、当ノブが表示名と共にレシオ値の表示に切り替わります。(デフォルトRatio値:-21)。レシオに切り替わった当ノブで圧縮/拡張比率(-で圧縮。+で拡張。)を調節し、11の切り替わったスレッショルド(後述)で圧縮/拡張の開始ポイントを調整します。
_ -
VELOCITY GAIN (+-10Velocity)左下配置
全てのベロシティの出力を定数増減します。
初期値:0
_ -
MAX VELOCITY (or Threshold)1~127 右上配置
出力ベロシティの最大値。基本は127です。
8.VelocityCurve選択メニューでComp/Expd(03)を選択(または同プリセットをロード)すると、当ノブが表示名と共にスレッショルド値の表示に切り替わります。(デフォルトThresh.値:39)。スレッショルドに切り替わった当ノブで圧縮/拡張の開始ポイントを調整します。
_ -
MIN VELOCITY 1~127 右下配置
出力ベロシティの最小値。基本は1。
11のMax値と同じ数値にした場合、全てのベロシティが同一ベロシティとして出力されます。
_ -
VELOCITY MONITOR AFTERTOUCH MONITOR
上段が入出力(Out:変換後)ベロシティ値モニター、下段がアフタータッチ値モニターです。後述の15.ベロシティ+(Plus)が発動すると、限界突破した仮想ベロシティ値が表示されます。
_ベロシティ操作についての考察と検証:
8.VelocityCurve選択メニューでLinear(01)を選択し、9.Curve値を0=直線に設定し、その他は初期値のままにする事が、再生においては収録時の正確なベロシティ反応に最も忠実な状態だと言えますが、MIDI演奏時においては各社製品ごとにキーボードのベロシティ特性がそれぞれ個別であり、また特に演奏技術の高い奏者の方にとっては、「このくらいの強さではこのくらい鳴って欲しい」というイメージがあると思います。
特に上級の演奏家の方は上記をご参考に、ご自身の使用キーボードでのベロシティ変化と当製品での鳴りの変化を「イメージに近い」ところに調整して頂く事で、より感覚的に没頭したリアルな演奏をお愉しみ頂けます。
※最適な調整値を獲得された方は、設定値や機器の組み合わせ例を弊社までお寄せ頂けましたら幸甚です。_
-
PP SOFTER 0~100(%)
弱いタッチを、Kontakt内部のVolume調整フィルター処理により一層小さな音量にするツマミです。こちらは音量調整でありベロシティのコントロールではありません。
このノブを上げていくことで弱打がより小さな音量となります。ご使用のMIDI鍵盤によっては、弱打域に大きめのレンジが設定されがちなこともあり、つまみを上げた方が強弱をつけやすいと感じる場面もあるでしょう。
MIDI鍵盤の個性を排除すれば、こちらもデフォルト値:0% でご使用頂くのが最も実際の収録時の反応に忠実です。上級の演奏家の方、または気になる方はベロシティ調整同様、感覚に近づけてご使用ください。同様に結果をお寄せ頂けましたら幸甚です。
_ -
VELOCITY PLUS (On/Offスイッチ)※PCT国際特許出願中
オン時 オフ時
強打時のMIDI音源の限界を突破し、疑似的に最強を超える128~254のベロシティを実現する機能です。(演奏での使用には、アフタータッチ機能付きキーボードが必要です。)通常のベロシティ127での打鍵時は、通常の最強音サンプルが再生されますが、その直後わずかな(ほぼ認識できない程の短かな)時間内にアフタータッチも検出した場合には、通常の最強音以上に強いサンプル音に素早くごく自然に差し替えます。
それにより、演奏中ここ一番のポイントなどでベロシティ127を超える表現が可能となります。MIDI音楽に一層の躍動感が加わります。PCT国際特許に一括申請中。(PCT PAT.p)
製品サイトのクラシックDEMO試聴コーナーでは数か所にこの発動を仕込んであります。迫力のある演奏をお楽しみください。クリックで機能のオンオフを切り替えます。オフ時にはグレー、オン時には有色アイコンとなります。
アフタータッチ検出時間内のピーク値により、3段階の限界突破サウンドレイヤーを配置しています。
演奏時に発動させるにはアフタータッチ対応鍵盤が必要になりますが、対応鍵盤がなくても、DAW等で後からアフタータッチ情報を追記して頂ければ手動で発動させる再生が可能です。
発動のためのアフタータッチ情報検知は、ベロシティ127のNoteOnを検出した直後のみ作動します。また、ベロシティ127のNoteOnから20ms以内に限ります。その限られた瞬間以外のアフタータッチ情報は、全て無視されます。
従い、仮にMIDIデータにアフタータッチ情報が無暗に混在していても影響はほとんど受けません。
チャンネルアフタータッチ(Mono_AT)、ポリフォニックアフタータッチ(Poly_AT)のいずれにも対応。発動条件に関わらず、いずれかを検出すると13のアフタータッチモニターにMonoかPolyかの判定と共に値がリアルタイム表示されます。また、限界突破サウンドが発動すると、13のアフタータッチモニターにVelocity+: “仮想ベロシティ値”が表示され、同時にボタンアイコン下のLEDインジケータが0.3秒間点灯します。尚、発動条件であるベロシティ127の判定は、前期8~13でのベロシティ変換後の数値で行います。
参考:“ベロシティ+(Plus)”機能の互換性について:(特許申請文書より抜粋・加筆)
本発明における限界突破の仕組みを搭載した装置の“ベロシティ+(Plus)”機能は、上位互換的であり、旧来の方法により既存機器で作成・完成したキーベロシティ127までの一般的なMIDIデータ(演奏データ)を遜色なく受け入れられる。一般的なMIDI演奏データにはアフタータッチ情報が含まれないため限界突破機能が当然に発動しないだけで、既存機器と全く同じ強弱のまま再生できる。それどころか、もしも演奏データに強いアタックでのアフタータッチ情報が記録されていた場合には、限界突破が発動し、旧来の収録・制作物であるにも関わらず、当発明の意図する「限界を超えた表現」が発現される。
【0059】
既存のMIDI演奏データにおいて、仮に異なる意図でアフタータッチデータが混入していた場合でも、本実施例では発動条件として単音ごとにベロシティ値が127(最強音)でありかつ、その発音から0.02秒以内のアフタータッチしか検出しないために誤作動の可能性は低い。仮に誤作動しても最強音がより強く鳴り得るだけであり、楽曲への影響は限られる。そもそも限界突破機能をオフにすることもできるので、影響を皆無にすることもできる。
【0060】
(下位互換)(既存機器での再現性)
上記と逆に本実施形態に係る限界突破プログラムを用いて記録・作成した限界突破情報(キーベロシティ127+アフタータッチ)付きのMIDI演奏データは、本実施形態に係る限界突破プログラムを搭載していない電子楽器、電子機器でもほぼ遜色なく受け入れられる 。
【0061】
限界突破として入力されたアフタータッチ情報付きMIDI演奏データは、限界突破プログラムを搭載していない既存機器ではアフタータッチ情報が無視され、単なるキーベロシティ127(最強音)として再生される。限界突破(音の差替え)は当然発動しないが、その既存機器なりの最大限のダイナミクス(強弱の幅)で問題なく再生できる。
【0062】
レアケースながら既存機器(本実施形態に係る限界突破プログラムを搭載していない電子楽器、電子機器)でアフタータッチが別の機能にアサインされていた場合、そちらが発動するという影響が出るが、本実施形態に係る限界突破用のアフタータッチデータは打鍵後0.02秒以内という極短時間のものであり、またアフタータッチは普遍的に「手を離せば0に戻る」性質のデータ(MIDI規格上)であるため、影響は限られる。
【0063】
即ちこれまでのMIDI機器やMIDI演奏データとの高い親和性・互換性を維持したまま、本件実施形態に係る限界突破プログラムを搭載した電子楽器、電子機器だけが、追加的優位性を獲得できるというメリットがある。
Release Control & White Noise Filter (v1.20 and later. Available in only Kontakt Full version)
Release ControlとWN Filter(v1.2.0以降。有料Kontaktフルバージョンのみアクセス可能。)
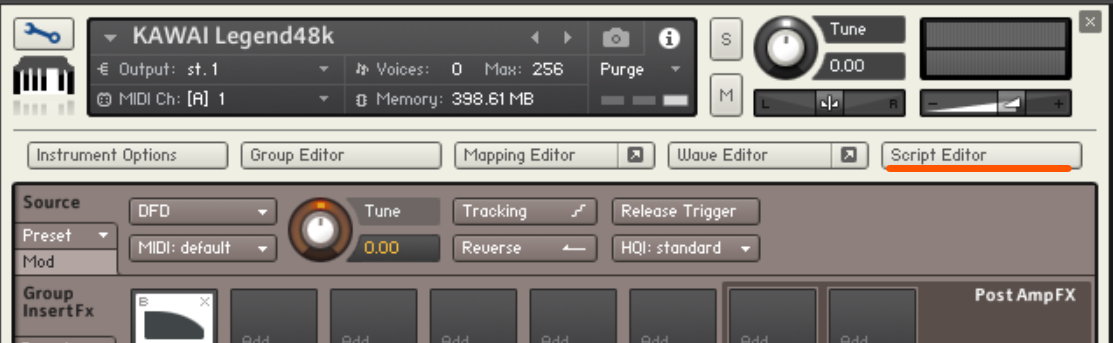
Click the Edit button with the wrench mark, and then click the “Script Editor” button, which is the farthest to the right directly under the Instrument Header.
Click the “Expert Setting” tab in the upper left of the displayed screen. Initially, only two buttons, “Release Control” and “WN Filter”, are displayed simply. Both are off by default.

When turned on, the bypass state of the decay-linked low-pass noise filter set for the main sound and OverTone sample group is released.
In normal usage environments, it can be said that it is desirable to use it in the off (filter bypass) state without impairing the original sound. The sense of air during tense studio recording is also one of the elements of sound source reality unique to sample specifications.
If you are concerned about white noise in situations where the SN ratio is emphasized, such as when playing at high volume, please try turning on the filter.
Release Control
When turned on, knobs for setting detailed parameters, graphic screens, preset buttons, etc. are displayed. We will disclose some of the things that were originally used internally as development screens for parameter management.
As a basic guide, the release parameters are delicately set in advance, and there is no need to make additional settings. Adjusting here may result in obstructing normal pronunciation, so unless there are special demands or circumstances, we recommend that you use it without adjustment.
Even when adjusted to your liking, we recommend that you aim for the “minimum changes” necessary to achieve the desired results.
In version 1.20, individual settings for each sample have been reviewed.
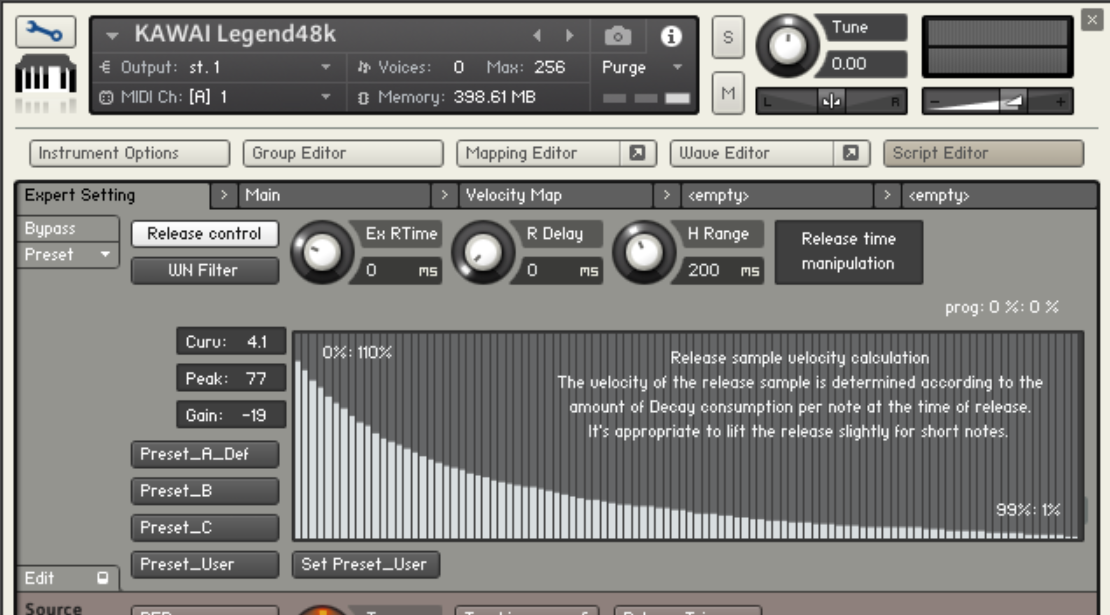
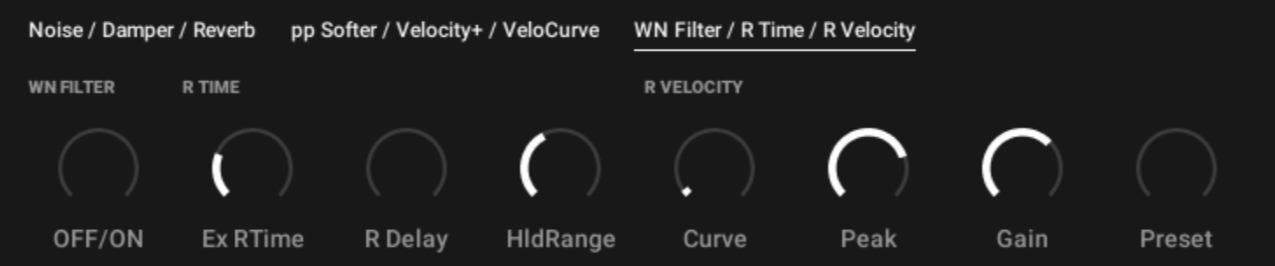
The three knobs that appear to the right of the Release Control button are used to adjust the release time, the pronunciation timing of the release sample, and their application range in individual note events. Further to the right, there is a text box labeled Release time Manipulation.

Ex RTime Knob
This adjusts the FadeOut time after the release of the main sample, before switching to the release sample.
Each sample originally has a separate FadeOut time value set to switch to the release sample, and this knob adjusts that setting in the range of -50ms to +150ms. If you set it longer, you can simulate a longer release time, but be aware that it will deviate from the natural sound because it is a mechanical FadeOut, different from the original release sample. Resetting it to 0 is the default setting.
R Delay Knob
This delays the pronunciation timing of the release sample (up to 50ms). Adjust this if it sounds blurred by increasing the value of the Ex RTime knob. Like the Ex RTime knob, it affects all notes and all samples uniformly, so please be careful. Resetting it to 0 is the default setting.
H Range Knob
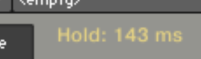
This is an abbreviation for Hold Range, and it sets the Hold time for which the values of the two knobs on the left (Ex RTime knob and R Delay knob) are applied. In other words, if it is not released between the note on time and this H Range value for each note signal, the knob settings on the left are ignored.
This is a function to limit the effect to staccato, etc. If you turn it all the way to the right, the range disappears and the values of the Ex RTime knob and the R Delay knob are applied to all releases. 200ms is the default value.
Underneath the three knobs of the Release time Manipulation, there is a large graph screen, to its left are variable parameters, and below that are lined up preset buttons.
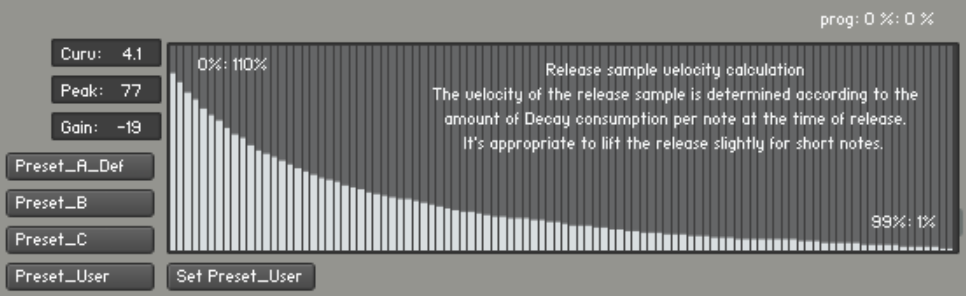
Graph
The velocity curve of the release sample is depicted, along with an explanation of the calculation of the release sample velocity.
The X-axis of the graph represents the decay rate of a single note (let’s call it “A”), which is the progress in the hold time of the assigned main sound sample, signifying its consumption. (Estimated)
The Y-axis of the graph represents the ratio (%) of the pronunciation velocity of the release sample selected when “A” is released, when the note-on velocity of “A” in the X-axis explanation is 100 (%).
By default, when released at a progress of 0% (i.e., immediately after striking a short staccato, the left end of the graph), the R sample is pronounced at 110% of the velocity at the time of striking, and when released at a progress of 99% (just before disappearing, the right end of the graph), it is pronounced at 1% of the velocity at the time of striking.
※ A progress of 100% is not simply the total length of the sample file, but is calculated based on the approximate time it takes for each key and velocity-specific sample to naturally stop ringing.

At the top right of the graph screen, the final release result at the time of actual performance is displayed in white characters. (X value: Y value)
Also, at the time of release, the corresponding scale of the graph flashes momentarily, allowing you to intuitively confirm the relationship between Hold time and progress (Prog).
Variable Parameters: Curv, Peak, Gain
On the left of the graph are three parameters: Curv, Peak, and Gain, which are the numbers that make up the formula to find the Y value at X time. The names Curv, Peak, and Gain are named based on the visual impact they give to the velocity curve.
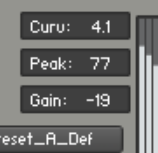
The image of the procedure for changing is to decide the curvature of the curve with Curv, adjust Peak and Gain to determine the intensity of the R velocity at X=0% time, i.e., the shortest staccato time (the left end of the graph) (such as 110%). At that time, it is necessary to keep in mind that the right end of the graph, X=99% time, is closest to 1% is the most desirable result logically and audibly.
However, X=99% vicinity means just before the end of the ringing, the frequency of occurrence is extremely low, and there is no difference that can be recognized whether the Y value (Release velocity) at that time is 1% or 5%, so there is no need to strictly stick to Y=1 (%) at the right end of the graph, X=99% time.
Because you can always return to the initial value with the preset button explained next, trying extreme values as a test may be useful to confirm the operation.
Preset Button
Below the three parameters are four buttons, Preset A, B, C, User, and a Set_Preset_User button to save to User.
The Preset buttons have the values of the three parameters Curv, Peak, Gain, as well as the Ex RTime knob R Delay knob saved (note that the H Range knob is not saved), and can be called up easily and instantly.
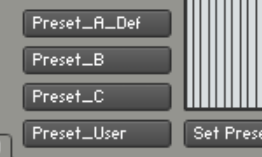
Preset A (Default): Y110% at X0% time. The default value, which is a strong recommendation, is saved.
Preset B: Y115% at X0% time. Assuming a case where the release is a little unsatisfactory at the initial value.
Preset C: In addition to Preset B, this is a model with a slight increase in Ex RTime and R Delay. In the actual machine, it is an image when the damper felt is a little loose. Loosely translated, it means “A. Faithful to the original, B. A little more releases, C. More”.
Preset User: Each parameter can be set freely and saved to the Preset User button by pressing the Set_Preset_User button.
NKS
All parameters and presets in this new feature can also be remotely operated on NKS hardware such as Komplete Kontrol. However, since the Set_Preset_User button cannot be pressed from the NKS hardware, when operating the NKS hardware, if you operate other parameters with the assigned preset knob (Page 3) set to “User”, it will be immediately remembered, so please be careful. Therefore, a “Free” mode that allows you to freely try parameters without affecting the User preset is provided as the fifth option on the preset knob in NKS hardware.